

Why LEARN Video?
Mid-2018, I knew I needed to add video to my own channels. I'd already added it for my clients. I understood the power of it. But was having a hard time consistently creating it for myself. So I conjured a solution, hired my son, and launched a docuseries called Love, Lark.
This is the trailer...
The series was met with lukewarm reviews. It's social media, after all. Some nice comments came in via YouTube and Facebook. One client dramatically expanded my role with their company after seeing the films.
Then, in early 2018, an email came in from a major TV & Web production agency. They'd seen the trailer and wanted to talk about greenlighting a professionally produced series, based on my docuseries.
You know the algorithms are video friendly. But it is so much bigger than that. When it comes to the world wide web, the video space is STILL like the wild, wild west. Wide open, waiting for you to claim a space in it.
Done right, video is THE most effective way to expanding your brand, tell your story, engage with fans, build a portfolio that sells your skill & stake your claim as an effective content creator.


MAKE VIDEO, MAKE CONNECTION. You've already got a thousand to-do's. But video isn't just one more thing. It is THE THING that helps you grow your brand, engage an audience and connect with fans. It generates more than 1200% more shares than text and images combined and
Here's everything you need to know to dive in, start creating and start making the kind of videos that can make you more money...


Favorite low-cost options for the first time video creator on limited budget. Basic tools that will help you create beautiful video while learning the ropes. If you're not sure about offering video services to clients, this is a good place to start:
iPhone 6s or larger
Approximate Total: $300

My go-to setup. The lens quality and versatility of the dSLR make it easy to switch between professional quality photos & videos. Filmed on an incredibly sturdy and simple tripod with the must-have sidearm boom tripod for overhead shots:
Canon 5D Mk III or Mk IV
Approximate Total: $5000

A toolkit full of film-forward tools. The quality plus price make this one of the best mirrorless 4K cameras on the market. Paired with 2 zoom lens's for every angle foodies might want to capture, plus 2 pro-level LED softboxes for artificial lighting.
Approximate Total: $6700


STEP 1: SET YOUR RECORDING SIZE
Select 1920 x 24. If shooting on a dSLR, you need to select your resolution and frames per second. If your camera allows, select the 1920x24 option. On this setting you will shoot maximum resolution and capture shots that have "cinematic" film like style. To quickly adjust the video settings on your camera, head on over to YouTube and search for "[YOUR CAMERA TYPE] How to Video Settings."
You will need to flip your camera to video mode (on a Canon, this can be done by twisting the dial near the "start stop" button to the movie camera.
If you plan to use slow motion, select 1920x60. This setting captures more frames per second, so there is more info to edit and you'll get a smoother slow-mo look.
STEP 2: ADJUST YOUR CAMERA SETTINGS
Set your fstop first. I tend to shoot on the lowest fstop possible, to allow for maximum light into the camera.
Turn your shutterspeed to 100. Start here, and you can always turn the shutterspeed up or down to adjust lighting as needed. I almost always adjust exposure by adjusting my shutterspeed.
Select as ISO that makes the scene properly bright. With shutterspeed at 100, turn your ISO to a number that makes the scene correctly light. I always shoot at 2 stops above "balanced" on my exposure meter.
STEP 3: SET YOUR CUSTOM WHITE BALANCE
For the most accurate color between scenes, and least amount of editing time, you'll want to set your white balance. Don't panic. Though it sounds fancy, this is an easy step and will quickly become second nature to you. For this one, hit YouTube and find a quick tutorial to walk you through setting white balance for your specific camera. Here's a good one for the Canon 5D and one for Nikon.
NOTE: If I am shooting on a cloudy day, or over a series of hours, when light tends to come and go in a variety of hues, I will often stick with auto white balance, and accept that the frames will edit together with variation between scenes.


LIGHTWORKS
Robust professional-level editing. There is a learning curve here, and the free version allows export in mpeg only, but this is the best bang for your budget-conscious buck.
COST:
FREE Basic Version or
$24.99/mo for pro


PREMIERE PRO
Adobe's professional editing software, and it's amazing. The comprehesive toolkit may seem daunting, but is surprisingly intuitive once you get past the well worth the 90-Minute learning curve.
COST:
From $20.99/mo with Adobe Cloud
ADD GREAT MUSIC
Good music can make your video stand out. To avoid copyright issues, always purchase from a well-respected source. 3 of my favorites:
1. SongFreedom.com - $50-100 per song, but a great selection of unique, catchy tunes.
2. JoshWoodward.com - Free with attribution. A nice selection of singer/songwriter music.
3. Pond5.com - $5-15 per song, robust selection and seamless search.
On a budget? Get instant access to lots of basic instrumental clips. About $100/year for unlimited downloads at AudioBlocks.com or click here to discover 33 Sites with Free Music for Videos.


1. Start with a Crash Course
Take the terror out of the learning curve with a superquick 90-Minute Crash Course designed to get you up and running with video asap. This one is for beginners, so if you're a total newb, you will love the step by step tutorials.

2. Increase Your Skills As You Edit
Just about everything you need to know, you can learn on YouTube. Search there for answers to specifics questions, and learn new skills as different editing needs arise, one video at a time.

3. Look like a pro with motion presets
Making moving titles and creative transitions in Premiere Pro with motion presets that help you mimic the look of After Effects. The CS Impact Bundle from FilmImpact has been worth every penny.


LIGHTING. The same lighting that works to create a beautiful photo translates well to a beautiful video.
FRAMING. The same framing and propping techniques that create a visually stunning photo work well for video.
CREATIVE. Just like photography, film is an extension of your creativity. It's an opportunity to show your style, to invite viewers into your world. Embrace it as a closely related cousin to photography, and you'll feel 2783927% less scared hopping into video creation.

MOVEMENT. With video, seconds without movement feel like hours. Every frame needs movement. Cut clips in the middle of action, rather than before it begins, to keep the pacing snappy.
STORY. Film requires attention. So giving viewers a plot, problem, solution gives them a reason to tune in and invest time watching your work.
LESS FINICKY. Shutterspeed and ISO on film settings are generally more forgiving than on your photo settings. You can generally crank shutterspeed way down, or ISO way up when it's dark outside, and still get a great looking scenes.
MORE FINICKY. There's no photoshop fixes here. So pay extra attention to smudges, drips and puppy hairs on your food.
LESS EDITING CAPABILITY. With RAW photos, you can save some shots you thought were unsaveable. Not so much with film. There is some ability to correct things light brightness or sharpness or color in post. But the options are limited. Shoot every frame as close to perfect as possible.

STEP 1: Create Stunning Thumbnails
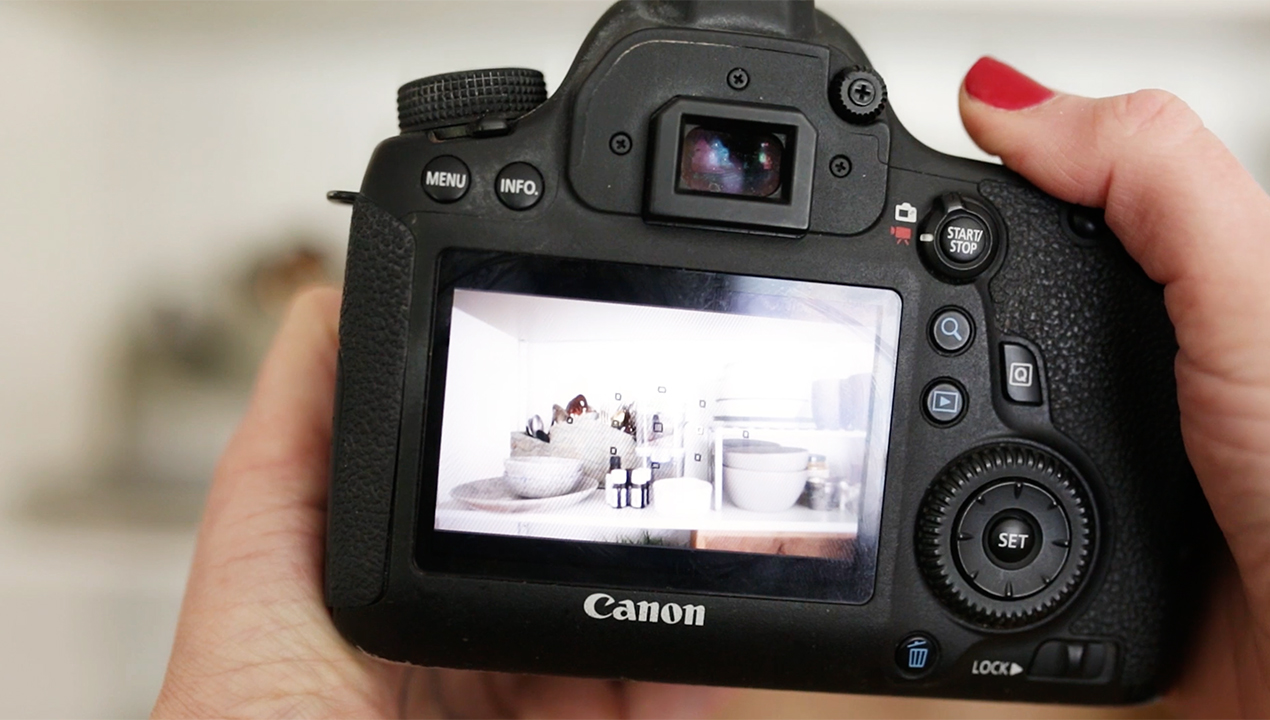
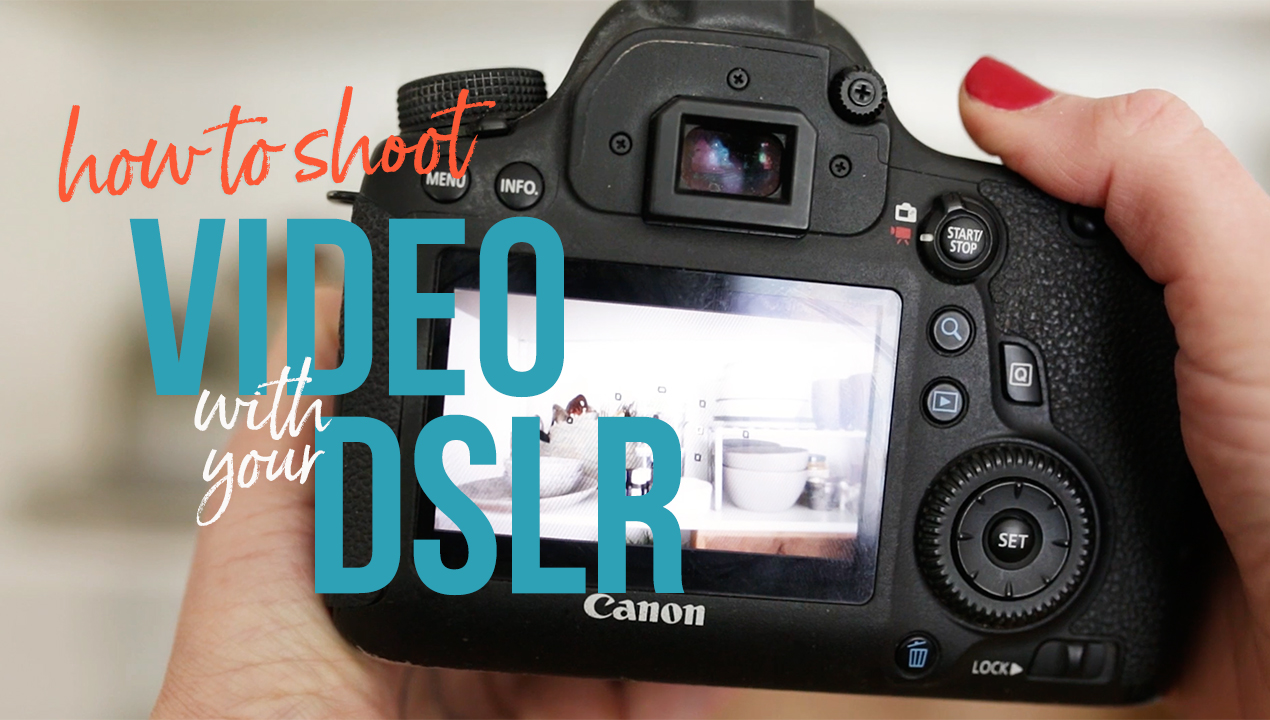
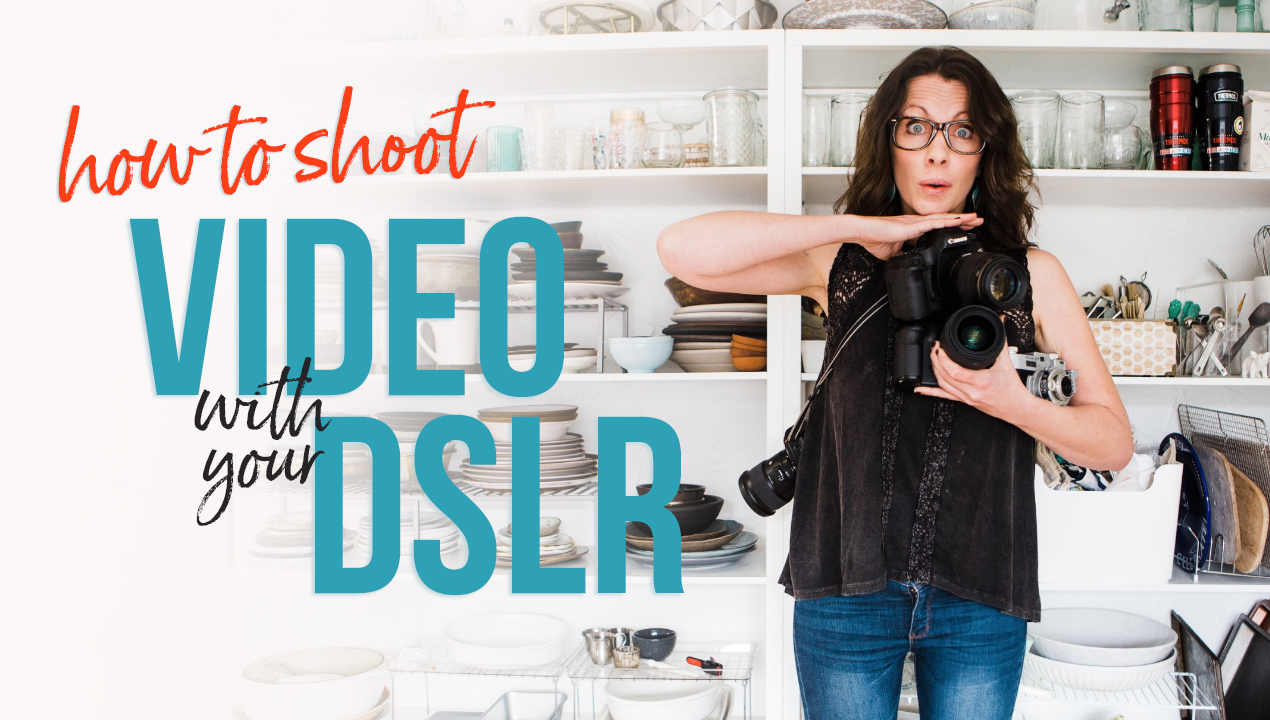
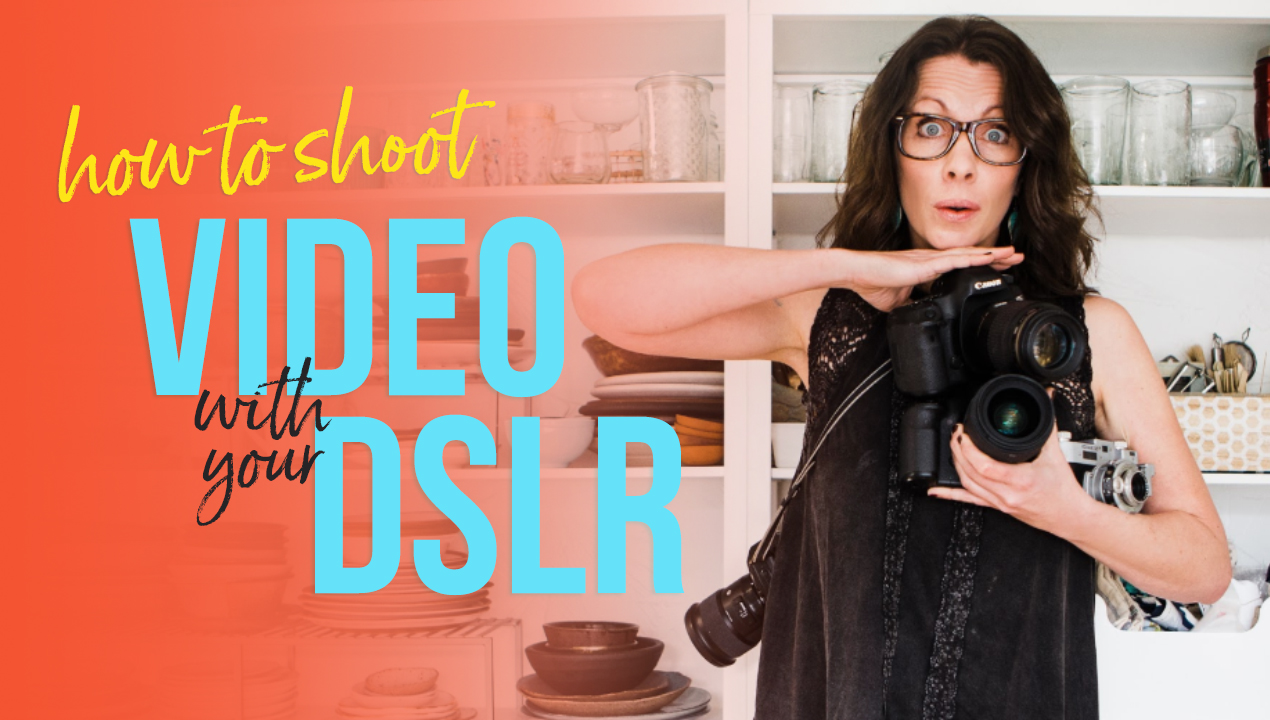
Always, always, always add a thumbnail. It is a free ad for your video.
The images above show 4 different thumbnail options for the same video. Which do you think wins?
According to most studies (and to TubeFilter) , the clear winner is the thumbnail which:
1. Includes a closeup of a face, preferably making eye contact.
2. Shows strong emotions.
3. Uses bright backgrounds.
4. Uses contrast and outlines.
5. Uses Readable Text
After shooting a video, I always include a few minutes of shooting photos to ensure I've got a good shot for thumbnails. A screengrab can be used, but generally doesn't have the same punch.
STEP 2: SHARE EVERYWHERE

Post to to YouTube First
Take advantage of Google SEO, as well as the powerful YouTube search engine and post your videos here first. It's easy to upload, easy to organize, and easy for followers and new fans to find you. If at all possible, post at the exact same time every week. Consistency is a key part of growth and reach.

POST EVERYWHERE ELSE AFTER YT
Embed in your blog posts.
Share on Facebook.
Share on Twitter, Instagram, LinkedIn and Reddit.
Alert your newsletter followers.
Announce it in Instagram Stories.
Share share share.
Make 1 video work 10x for you.


6 Weekas + 25 Foodie Videos
Here’s What Happened
In February, I invited 25 foodies to make 1 video per week for 6-weeks. Together we would track & share metrics, see what was really working. Most of the group was brand-new to video, had never posted once on YouTube.
Weekly challenges were designed to be filmed and edited within 2 hours each. The prompts were food blogger focussed, but specifically designed to go beyond the Tasty-style video. What other ideas could a foodie create with their camera? Turns out, the possiblities are endless.
People dig real life snippets, especially when real life is messy/crazy! It doesn't have to be big/scary/super personal for them to relate. (Erin Parker, thespeckledplate.com)

3 Non-Tasty Style Videos That Work Well for Foodies
1. A Day in the Life
This got significantly higher organic reach than my last Tasty video that I published a few days before. (Melissa Belinger, simplywhisked.com | Week 1, Day in the Life)
WHY THIS STYLE WORKS: A great way to share the story of your life, create a branded video, and make more content without killing yourself.
HOW TO MAKE IT: Place a camera on a tripod, and let it film you going about your day.
QUICK TIP: Keep your shots close, so viewers can see inside your life. Film yourself doing something watchable, add a little flair--dance, get messy, let life get in the frame. Keep the edits snappy. If something interesting isn't happening in the frame, speed it up or cut it out.
2. LIVE VIDEO
I was surprised to have so many people comment on this to me in REAL LIFE - a lot more people watched or at least tuned in than I expected. (Felicia Barger, thestarvingchef.com)
WHY THIS STYLE WORKS: Algorithm friendly. You don't have to have a lot of equipment, no editing required. So while setup and prep might be time-intensive, once's it's done, that's a wrap!
HOW TO MAKE IT: Use your iphone or a high-quality webcam/laptop camera. Tripod or laptop on your countertop. Cook, chat to the camera, invite viewers into your kitchen.
QUICK TIP: Promote ahead of time. Go live with a clear topic or story. Viewers should know what you're talking about, and why they want to tune in.
3. SHOW A NEW ANGLE & SHOW YOU
This is the style I should continue with, definitely a success." (Laura Tobin, yourguardianchef.com)
WHY THIS STYLE WORKS: Recipes are naturally prepared on a countertop. So setting your camera up to show the process is a relatively simple way to show 2 things fans love: you + food.
HOW TO MAKE IT: Place a camera or iphone on a tripod, or set a laptop on the counter. Hit record. Use a second camera to add another angle, or capture close-up "b-roll" shots. Edit together with snappy pacing.
QUICK TIP: Know your audience. Create videos that answer questions they have, engage the with stories they'll love. Don't just show you, show that you know them.


Meet MY SCRAPPY FILm MENTOR
February 9, 2018 | PM from @thefoodfreakk
"Hi Brooke, just started following you. Just wanted to say thank you for that shot of inspiration in your last post. Going through a split with my fiance and I'm not sue we're gonna make it. I've owned a food truck in the city, been doing photo and video for food clients the past few years, but something still feels missing, and the think that scares me the most that I thikn I'd be greatest at is YouTube show around me and my unique food style. And your post is what I needed to hear.
So thank you, words are important and your words were heard by someone who needed to hear it. I want you to know that I hope to stay in touch..."
February 10, 2018 | PM from @thefoodfreakk
"...So I took your advice and made a video and posted it to my page."
February 22, 2018 | PM from @thefoodfreakk
"...Started by YouTube channel and have been posting videos as fast as I can make 'em!! Feels good!"
5 LESSONS I LEARNED FROM Not another cooking show
1. Go All In.
If video is your focus, go at it with laser focus. Post consistently, post regularly. Create an editorial calendar, stick to a schedule. No lukewarm allowed.
2. Call You By Your Name.
If you say you're a food blogger, you'll become a food blogger. If you say you're a filmographer, you'll become a filmographer. Use big words, and you'll grow into your big britches.
3. Create Good Content
Quality, not quantity.
4. Produce Series, Not Videos
Pick a theme, and stick to that theme for at least 6 episodes. This will not only hone in your creative madness, it will also set you up for significant potential growth on platforms that matter. Namely, Facebook Watch.
5. PROMOTE THYSELF
Don't just make videos, create magic. Don't just tell them to subscribe, make them want to subscribe.
2020 Update: Steve Cusato now has more than 300K YouTube subscribers. His approach to video has been an absolute success. So proud of him!
“Yourviewershavetowalkaway
feelingliketheytookmoreawayfromYOU
thanyoutookfromthem.”
-ScottAlexander Director of Digital Brand Marketing Oakley @sc00ter5

Want a shortcut to video success? Start now.
Don't wait until you have a better kitchen, more time or seasoned skills. JUST START. Start with these 3 steps, and you are well on your way to rocking video success on the interwebs.
1. Pick a FILM STYLE.
2. Start a Series.
3. Stick to it for at least 6 weeks.

The Easiest Way Ever to Get Started With Video
You don't have to be a tech genius or film school grad to create absolutely stunning video...in just 2 hours. My 90-Minute Food Video Crash Course was designed for creatives like you, who need to get up and running fast. Got a dSLR and 90 minutes? Then I can show you everything you need to know to film, edit and publish your first food video.